I've been thinking a lot about the dev environment that I use for my hobby projects. I never thought it was anything special but I've adopted some of this environment for my work in Unreal Engine and co-workers have found some of bits novel and integrated them into their workflows. So in the interest of potentially sharing some useful tips and tricks I decided to write down what I'm currently building code on top of in 2023. This also serves as a useful reference point for future me if I ever forget exactly how some of my build machines are configured.
Foundation
As the title suggests this will be primarily focused on Windows. However a lot of the software here would either be redundant or otherwise available for other platforms. Specifically I will be showing bits from Windows 11 but will try to accomodate for 10 as well if there are any known divergences.
My hobby development these days is mostly in C with a dash of C++ and the occasional romp in Rust and Zig. I'm mostly interested in native development like this so that's the domain of problems I'm trying to solve here.
Get a better (Windows) Terminal
If you're on Windows 10 you have to go get it (on github here) or if you're on Windows 11 you get it right out of the box. If you've been using Powershell or raw dogging cmd I think you should treat yourself better and give Windows Terminal a shot. Even if you use nothing else here just being able to have a single terminal that can open shells in cmd, powershell, wsl, etc. is a major time saver. Plus it has a nice amount of customization too so you can hone in on whatever look you're after.
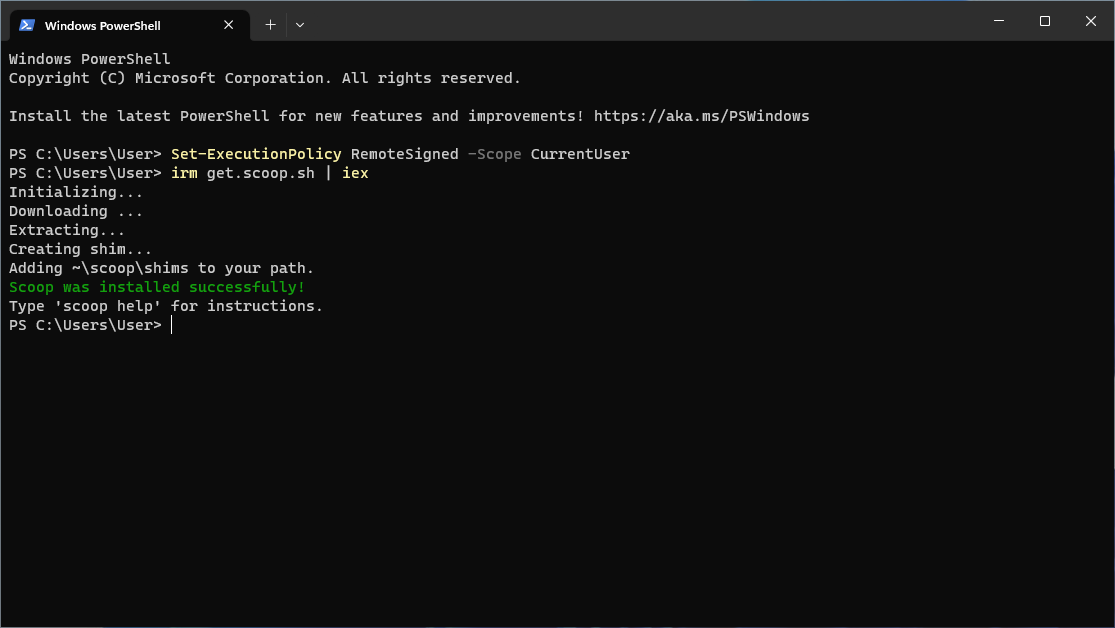
Scoop up a package manager
In the dark ages Windows used to not have a viable package manager for installing software from the command line. Nowadays there are a few choices. Winget is the offering from Microsoft and Chocolatey is the OG but I've fallen in love with scoop. You can find this wonderful friend over at https://scoop.sh/ and you can install it easily from any powershell prompt.
Cmding a more powerful shell
Powershell isn't bad these days but if you're like me it would be nice to have a more unix-like environment. There are lots of options for going this route. Msys2 and cygwin have been around the block but I find them a bit crusty these days. I don't want to have to have an entire separate environment that pretends to be unix I want unix tools in my Windows environment; ideally I want to be able to still have access to cmd / powershell in case I need to run more windows-native tools. This is where I find myself always reaching for cmder. You can get it bundled with the conemu terminal emulator over at https://cmder.app/. This is a great option for folks who don't want to use Windows Terminal or who don't want to bother mucking around with getting cmder bootstrapped into Windows Terminal.
! WARNING ! This used to be easier but as of the time of authoring this article some annoyances have crept in here. I still think it's worth it but hopefully some of the nastiness of the process here will be addressed in the future
There are two types of cmder we can install. The lighter install is just cmder and the full install with all the gubbins is cmder-full. We can just install cmder and we'll use scoop to install some additional tools.
But before you scoop it up there is a bug in the latest version. Version 1.3.21 has problems interoping with one of its dependencies (clink) so we will be installing 1.3.20 here. Thankfully it's really easy to pin this version to avoid future issues. Keep an eye on this github issue to see if this has been fixed.
For now you'll want to do:
scoop install cmder@1.3.20 to install the package at a working version
scoop hold cmder to ensure that scoop will not try to be helpful and install the newer version when you go to upgrade other packages.
And that's it! Hopefully in the near future we'll be able to just scoop install cmder and forget.
Unfortunately that is not the end of our labor. We have to add a cmder profile to Windows Terminal. So we'll head over to the terminal settings. You can do a lot with this UI but open up the JSON file if you want to be able to directly replicate how I've configured this already. Simply add this under the profiles's list array. Don't forget to set your default profile to the guid here if you do want this to be your regular terminal. Works nicely with right-clicking in explorer and selecting Open in Terminal.
{
  "backgroundImageOpacity": 0.75,
  "closeOnExit": "graceful",
  "commandline": "cmd.exe /K \"%CMDER_ROOT%\\vendor\\init.bat\"",
  "cursorColor": "#FFFFFF",
  "cursorShape": "bar",
  "font": {
    "face": "Consolas",
    "size": 10.0
  },
  "guid": "{1350f725-af80-4998-98ee-2659894a7eca}",
  "historySize": 9001,
  "icon": "%CMDER_ROOT%\\icons\\cmder.ico",
  "name": "Cmder",
  "opacity": 50,
  "padding": "0, 0, 0, 0",
  "snapOnInput": true,
  "startingDirectory": "%USERPROFILE%",
  "useAcrylic": true
}
Now close your terminal because scoop was helpful and set some cmder related environment variables for us and we'll need those to be relevant to the Windows Terminal process in order to finally boot. You should be greeted with something like this:
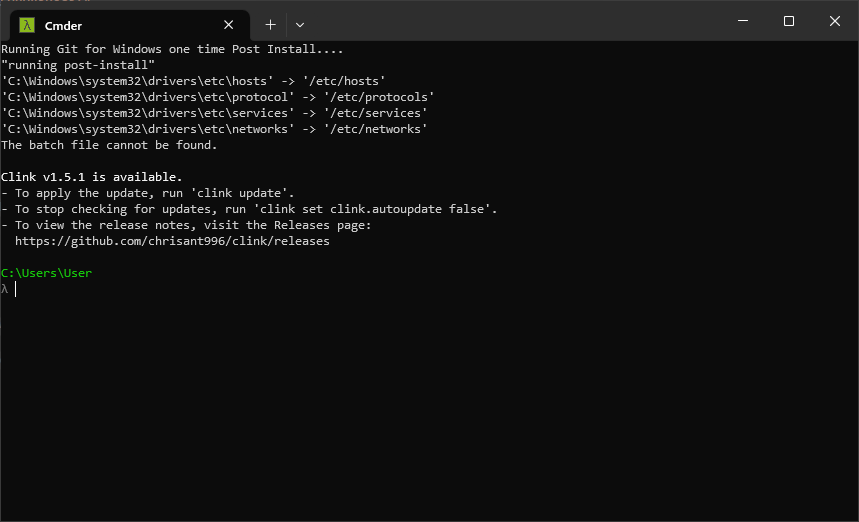
You should take note of the clink message there. I usually just run a clink update whenever it pesters me since it's a fast process. Maybe in the future there might be a good way to manage that with scoop too.
If you installed cmder-full instead you'd be fine to use the cmder bundled busybox and git but we have a package manager for those. Busybox is the most immediately useful and we can get it with just scoop install busybox.
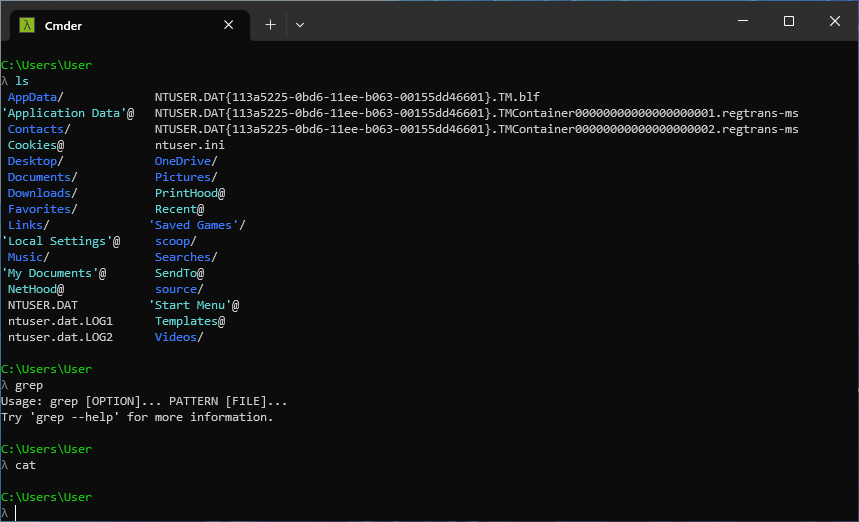
Now we have an environment that has all the windows ports of unix tools found in the git-for-windows distribution but with some extra helpful macros. A favorite of mine is that e. will open your current directory in explorer. Other than that you're free to ls, grep, awk and cat to your heart's content in the same window that you can also run that .bat script your coworker wrote or quickly invoke a simple powershell command to run that .ps1.
A couple extra notes
Scoop separates applications in to buckets to try to organize packages by usage. I recommend taking a peek at all of them because there's some neat stuff there. If you're a Java developer for instance or maybe you just need to get ahold of Java 1.8 for Minecraft there is a java bucket just for you! For the rest of you I recommend adding the extras bucket if you're going to continue to follow along.
scoop bucket add extras is all you need
More than just a shell
I'm sure for many people that's enough but we only have a terminal and a shell that doesn't suck. Since we're trying to do some programming here we should get some tools. There are kind of two categories of tools here that I'm going to show off. Some are required for getting my code compiled and others are purely due to personal preference; I'll try my best to separate the two for you.
General tools:
gsudois a command line helper for that "I wish I could sudo on Windows" problem. Justscoop install gsudoand be careful using admin rights.vscodeis my editor of choiceblendercan be installed from here and it works perfectly! I use this for whenever I need to inspect or edit any 3d modeladbis useful if you ever want to mess with an android device and not have to install the whole android-studioandroid-studioitself is also heretinynvidiaupdatecheckeris a favorite for keeping nvidia drivers up to date without having to log in to an nvidia servicepowertoysis even here which I rely on for managing splitting up my vertical monitor
Programming tools:
gitFor version controlgit-lfsFor pulling large filesninjaThe wonderfly fast build tool that I target with...cmakeMy beloved & reviled C/C++ build systemvulkanFor getting a hold of the vulkan sdk (mostly for the directx shader compiler)llvmI love the llvm for windows toolchain and it can be installed here with minor fuss (see notes)w64devkitBecause I also want to get agccinstall to be able to compile code with the MinGW toolchainvcpkgThe C/C++ package manager based around cmake
The only manual step here is that we need to add an environment variable for vcpkg. We can do this from the command line pretty easily with just setx VCPKG_ROOT %USERPROFILE%\scoop\apps\vcpkg\current
and a quick reboot of our terminal. This is really just so that my build system knows where the vcpkg toolchain is more than anything; you may not need this.
More Notes:
The LLVM for Windows toolchain still relies on an install of Visual Studio and the Windows SDK. I won't cover that here but all you really need to do is install a copy of Visual Studio 2022 and configure it for C/C++. Maybe there's a good minimal install for the visual studio build tools but I haven't found one that I like. Also for this article I'm verifying all these steps on a VM with the Windows 11 Developer image which comes with VS 2022 already installed.
My projects used to rely on some vcpkg ports that hadn't made it to the version of vcpkg installed by scoop. That sort of situation may occur again so another option is to just manually install vcpkg by cloning it from github.
Building code
After just a scoop install git-lfs ninja cmake vulkan llvm w64devkit vcpkg I am able to simply clone my hobby repo and I'm ready to build... almost.
Due to a REALLY annoying quirk in the ktx package I depend on I have to have an install of bash that ktx's cmake script is able to find. The easiest way to do this I've found is to manually install the Git for Windows distribution and select all the default options to install it to Program Files. Otherwise the default C:\Windows\System32\bash.exe will fail; even if you have a working WSL install the ktx build won't work. The alternative to this isn't much better. You can edit your PATH environment variable to put %USERPROFILE%\scoop\shims before C:\Windows\System32\bash.exe and set the env var VCPKG_KEEP_ENV_VARS to PATH to persist the variable to vcpkg's build environment. This isn't really any better if you ask me.
You can see more detail about my build system on this other post but from here in the command line we can just do cmake --preset x64-windows-ninja-llvm to configure and cmake --build --preset debug-x64-windows-ninja-llvm to build. If you're following along the vcpkg dependency compilation step can be a bit slow but it's been pretty reliable across the various machines I test builds on.
And beyond
The real backbones of this whole setup are scoop and vcpkg. You could skip the whole cmder section of this and still be fine. In fact that's what I've done on the machine I use as a build box since cmder is almost entirely for the comfort of the manual command line driver.
I encourage you to give this setup (or maybe only the parts that sound good to you) in a VM or perhaps a secondary machine and see how they feel for you. I've been really happy with the ability to do things like right click to open a terminal somewhere and then from the keyboard be able to open multiple tabs (ctrl-t to open a new tab and ctrl-w to close the focused tab!), navigate, and run scripts. The e. alias is really powerful for the inevitablilty of having to open something in Windows Explorer and being able to get VSCode running out of a folder with just code . has felt really comfortable.
If you have any ideas on some improvements to this setup please feel free to reach out! I'm always on the look out for useful additions to this sort of setup. In the event that this setup goes through a massive overhaul I'll write a sequel.